Hello, all! I am posting this late because............I forgot about it! I don't have a new craft to show you this week. However, I wanted to share with you an awesome resource I came across for teaching your children the letters of the alphabet. It makes me wish my two boys didn't know their alphabet so I could go back and do this with them. There are plenty of alphabet resources available online, but what I REALLY love about this program (besides that all the ideas are FREE!) is that each lesson starts with a book that you read with your child. Then you do a fun and simple activity which goes with the book and emphasizes a letter of the alphabet. As you go through the letters, your child will assemble a keepsake letter book that they have made with you. I just love this idea!
I sometimes get asked either by parents of students I teach or by readers of my Montessori blog if it makes a difference what order you use to teach the letters of the alphabet. My suggestion is to do it however feels right for your family. One suggestion is to start with A and go through the whole alphabet in order. Another idea is to start with the letters of your child's name since they have intrinsic meaning for the child. Then you could add the letters of the names of other family members and continue until you've gone through the alphabet. Anything is really fine and remember that the most important thing is to have fun!!
CLICK HERE for the link. This post will show you how to make the letter folders and to set it all up. It will also have links to all the posts written for individual letters.
Showing posts with label Mommy and Me. Show all posts
Showing posts with label Mommy and Me. Show all posts
Monday, February 21, 2011

Monday, February 14, 2011
Mommy & Me Monday: Happy Valentine's Day
Happy Valentine's Day, Everyone! Hope you have a lot of lovin' planned for today. I am sharing two ideas to do with your little ones. The first one is a keepsake handprint project. We made these for the parents of my Montessori students last week and I'm pretty sure they'll be treasured for years to come. CLICK HERE to go to the post I wrote about the project on my Montessori blog. It has some tips and directions as well as a link to print the label if you want. I am not able to upload documents here on Blogger, but I can on Typepad (the other blog).

The next idea is a baking project. We are also making these at Montessori this week. These are little "heart tarts" made from refrigerated pie crust and strawberry jam. I found the idea and recipe in the latest issue of Family Fun magazine. These were really easy to make and tasted really good. I didn't even frost mine and thought they were still yummy. They taste like mini-pies or kind of like pop-tarts. CLICK HERE to go to the Family Fun website for the recipe.

I know I'm posting this a bit late for you to make these to give as gifts for Valentine's Day this year. However, if you think ahead, these would be great to give Grandma for Mother's Day. You could do this in fabric paint on a t-shirt or canvas bag. Or do it on paper and place it in a special frame. You'll probably want to make some to save for yourself as well!

The next idea is a baking project. We are also making these at Montessori this week. These are little "heart tarts" made from refrigerated pie crust and strawberry jam. I found the idea and recipe in the latest issue of Family Fun magazine. These were really easy to make and tasted really good. I didn't even frost mine and thought they were still yummy. They taste like mini-pies or kind of like pop-tarts. CLICK HERE to go to the Family Fun website for the recipe.

Monday, February 7, 2011
Mommy & Me Monday: Valentine Suncatchers
For this simple, yet beautiful, craft you will need: clear contact paper, tape, tissue paper, and scissors. Precut some tissue paper into small pieces. Cut out a square of contact paper (mine was approximately 8X8 inches........I just eyeballed it), remove the backing and use Scotch tape to tape it to the table STICKY SIDE UP. Just put one piece of tape across each corner. This will make it MUCH easier for your child to complete the activity, believe me! After you've secured the contact paper to the table, let your child cover it with the pieces of tissue paper. This is a great activity for refining and strengthening those little finger muscles.


Once the contact paper is covered with tissue pieces as shown below, cut another piece of contact paper about the same size and place it on top STICKY SIDE DOWN. You are basically making a tissue paper sandwich. Smooth out any wrinkles in the contact paper and make sure the two sides are sticking together securely.

Cut the "sandwich" into a heart shape and tape it in your window. So pretty! (Tip: I just folded my contact paper sandwich in half and cut half a heart on the fold. This resulted in a symmetrical heart shape. If your child is able, you could draw a heart shape with a marker and have them cut it out.)


Once the contact paper is covered with tissue pieces as shown below, cut another piece of contact paper about the same size and place it on top STICKY SIDE DOWN. You are basically making a tissue paper sandwich. Smooth out any wrinkles in the contact paper and make sure the two sides are sticking together securely.

Cut the "sandwich" into a heart shape and tape it in your window. So pretty! (Tip: I just folded my contact paper sandwich in half and cut half a heart on the fold. This resulted in a symmetrical heart shape. If your child is able, you could draw a heart shape with a marker and have them cut it out.)

Monday, January 31, 2011
Mommy & Me Monday: Melt the ice cube game
"Melt the ice cube" is a fun game to play with your little one. In fact, your whole family may want to join in. I have had this out as an activity in my Montessori classroom for the past week. The photos shown are ones from when I set this up in the classroom two years ago. At that time, I had two children do the game together and each child had their own ice cube to melt. Right now in my classroom I have two children play together, but they jointly try to melt one ice cube. Of course you may decide how you'd like to do this in your home setting.
The gist of the game is that you roll a die to determine which action you must take to try to melt your ice cube. The second photo shows a close-up of the chart which tells what you have to do for each number rolled. There are lots of giggles and squeals when a number two is rolled. If you are interested in printing out your own chart, CLICK HERE. That link will take you to my original post which has a hyperlink to the site where you may download the printable. Hope you have some chilly fun doing this. It may be perfect to go with the weather we are supposed to get this week.


The gist of the game is that you roll a die to determine which action you must take to try to melt your ice cube. The second photo shows a close-up of the chart which tells what you have to do for each number rolled. There are lots of giggles and squeals when a number two is rolled. If you are interested in printing out your own chart, CLICK HERE. That link will take you to my original post which has a hyperlink to the site where you may download the printable. Hope you have some chilly fun doing this. It may be perfect to go with the weather we are supposed to get this week.


Monday, January 24, 2011
Mommy & Me Monday: Iceberg Play!!
Your kids will think you are the coolest mom ever if you make them this fun (and easy) activity. Simply freeze some bowls of water in your freezer and you have instant icebergs. I have this exact activity out in my Montessori classroom now as we are studying arctic animals. I place the iceberg on a blue tray (which represents the arctic ocean) and added a basket with arctic animals. This exact set of animals can be found at Michael's or Hobby Lobby. It it the Safari Arctic Animal TOOB. Of course you could use any small animals and your kids will have a blast. Keep a small towel on hand for them to wipe cold hands on. It doesn't get much easier than this. Add in a literacy component by reading some books and stories about arctic animals. Have fun!!


Monday, January 17, 2011
Mommy & Me Monday: Snow Dough

This activity is so fun. You make up a batch of "snowy" playdough and let your child use it to create snowy things like snowmen. CLICK HERE to go directly to a post I wrote a few years ago about making "snow" playdough. In addition to a link to the homemade playdough recipe, you'll see some photos of cute snowmen made with the dough. A few other ideas besides making a snowman with cookie cutter circles and beads are: help your child make a 3D snowman by showing them how to roll the playdough into balls then use things you find around your house to decorate your snowperson OR roll the dough out flat to make some "snowy ground" then have your child use small plastic animals to make animal tracks in the snow.
Monday, January 10, 2011
Mommy & Me Monday: Painting Snowflakes
This week's project is super simple. You will need only a few materials: some paper doilies (found locally at Kally's General Store on the square) and watercolor paints. I placed doubled-up paper towels under the doilies when my boys painted them.

Once you have everything set up, just allow your child to paint as they wish.


Once you have everything set up, just allow your child to paint as they wish.

Here is one of my sons' finished snowflakes. I meant to take a photo of them taped up on our window, but it got too dark!! If you are a bit of a snowflake purist (i.e. you only think snowflakes should be white.........I confess to being a closet snowflake purist myself) you can CLICK HERE to see how I set up a snowflake-making activity in my preschool classroom. (NOTE: Snowflake purists should omit the painting step....... ;-)


Monday, January 3, 2011
Mommy & Me Monday: Book Activity for "The Mitten" by Jan Brett
This project is from the "archives" of my personal blog. Even though I've had several days off from my job, my boys and I didn't get around to doing a new project for me to post about this week. Luckily, I had this one from a few years ago to share with you. In January I like to do "wintry" activities in my preschool classroom and also at home with my boys as I have time. When possible, it's fun to do an activity that goes along with a great book. The Mitten by Jan Brett is one of my all-time favorite books to read with children in the winter. For this project my boys and I made patchwork, laced mittens and also made some animals to place in the mittens to act out the story. CLICK HERE for my original post which includes links to where you can download a mitten pattern as well as the patterns for the animals. My boys loved retelling the story with their "props".

The next photo shows the animals that my oldest son colored to go in his mitten.

The photos below show the mittens my boys made two years ago when my oldest was 7 1/2 and my youngest was three.

The next photo shows the animals that my oldest son colored to go in his mitten.

Monday, December 27, 2010
Mommy & Me Monday: Gingerbread Playdough
Hello, everyone! (Or "Hello, to the two or three people who might actually be reading this!"----Just kidding!) Hope you all had a blessed holiday with your family. Today's idea is still a bit Christmasy, but would be a great way to keep your kiddos entertained. As a literary tie-in to this project, consider reading some "gingerbread" books with your child. One of my favorites is Gingerbread Baby by Jan Brett.
I love to make scented and special playdough for my Montessori classroom. During the last week of school before break, I put out gingerbread playdough which was very popular. I posted about homemade playdough in September, but here is the basic recipe again.
Homemade playdough:
1 cup flour
1 cup water
1/2 cup salt
1 T. vegetable oil
1 T. granulated alum OR cream of tartar
Food coloring and add-ins as desired
Stir all ingredients together in a saucepan. Once combined, cook over medium heat, stirring constantly. You will continue to stir until the mixture gets really thick and dries out somewhat. If there are still "wet spots", keep stirring until those are mostly gone. Turn playdough out of pan and allow it to cool slightly. When it is cool enough to handle, knead the dough until it becomes smooth. If it is too sticky you can add in some more flour at this point. Once completely cooled, playdough can be stored in an airtight container and kept for several weeks.
To make the gingerbread playdough I made the basic recipe and added in quite a bit of ground cinnamon, ground cloves, and allspice. I don't measure, I just dump a bunch in and stir it up until I feel it is fragrant enough. For those of you who like things more specific, try adding a teaspoon of each to begin.
Below you can see how I set this up in my clasroom. I added a rolling pin, gingerbread cookie cutter, placemat and a little bowl of pony beads to use as decorations.


I love to make scented and special playdough for my Montessori classroom. During the last week of school before break, I put out gingerbread playdough which was very popular. I posted about homemade playdough in September, but here is the basic recipe again.
Homemade playdough:
1 cup flour
1 cup water
1/2 cup salt
1 T. vegetable oil
1 T. granulated alum OR cream of tartar
Food coloring and add-ins as desired
Stir all ingredients together in a saucepan. Once combined, cook over medium heat, stirring constantly. You will continue to stir until the mixture gets really thick and dries out somewhat. If there are still "wet spots", keep stirring until those are mostly gone. Turn playdough out of pan and allow it to cool slightly. When it is cool enough to handle, knead the dough until it becomes smooth. If it is too sticky you can add in some more flour at this point. Once completely cooled, playdough can be stored in an airtight container and kept for several weeks.
To make the gingerbread playdough I made the basic recipe and added in quite a bit of ground cinnamon, ground cloves, and allspice. I don't measure, I just dump a bunch in and stir it up until I feel it is fragrant enough. For those of you who like things more specific, try adding a teaspoon of each to begin.
Below you can see how I set this up in my clasroom. I added a rolling pin, gingerbread cookie cutter, placemat and a little bowl of pony beads to use as decorations.
Here is a photo of a gingerbread man made by one of my students. This dough smells SO good, your children won't want to stop playing with it. You will probably be compelled to join in the fun as well!
Monday, December 20, 2010
Mommy & Me Monday: Christmas Morning Coffee Cake Mix
This week's idea would be a great last-minute gift idea as well as something fun to mix up and eat with your own family on Christmas morning. If you are anything like me, I am always so busy with last minute details the week before Christmas that I usually forget to plan something special for us to eat on Christmas morning. Last year right after Christmas I came across this recipe in a Country Woman magazine. I immediately thought it would be a wonderful teacher gift idea. I like to give functional or practical gifts and figured many people might enjoy having something quick, but special to whip up on Christmas morning. So.......this week my littlest boy and I made up four batches to give as gifts. (NOTE: Four batches of this recipe yielded 8 gifts to give as each batch makes two batches.) He liked helping me measure the ingredients, but he was VERY happy to help smash up the graham crackers for the topping mix. He also loved using our nut chopper to chop up the pecans. I remember chopping up nuts for my mom as a little girl. It made me feel very important to have that special job. OK.......enough rhetoric.............here's the recipe. (HERE is a link to it online.)
Christmas Morning Coffee Cake Mix
Ingredients:
4 cups all-purpose flour
2 cups packed brown sugar
2/3 cup quick-cooking oats
1/3 cup buttermilk blend powder (my husband found this at Wal-Mart)
2 tsp. baking powder
2 tsp. ground cinnamon
1 tsp. salt
1/2 tsp. ground nutmeg
1 cup shortening
Topping Mix:
1/2 cup graham cracker crumbs
1/2 cup chopped pecans
1/4 cup packed brown sugar
1/2 tsp. ground cinnamon
Directions:
In a large bowl, combine the first eight ingredients. Cut in shortening until mix is crumbly. In a small bowl, combine topping ingredients. Store both mixes in separate airtight containers in a cool dry place for up to 6 months. Yield: 2 batches
To prepare:
In a large bowl combine 2 eggs, 1 cup water, and 4 1/2 cups cake mix (or half of the big batch if you've divided it up). Stir until just blended. Transfer to a greased 9-inch square baking pan. Sprinkle with 2/3 cup topping mix (or half the original batch). Bake at 350 degrees for 30-35 minutes, or until a toothpick comes out clean. Serve warm.

After making my batches, I went ahead and divided each batch into two, spooning the mixes into Ziploc baggies. I labeled the baggies as you can see below.

To package these gifts, I stitched up some little fabric bags (since I love to sew and had some Christmas fabric on hand) and placed a baggie of cake mix and topping mix into each fabric bag along with a card with preparation instructions. Then I tied the top closed with ribbon. You can see some of our finished bags in the photo below. I will be sure to tell the recipients to open before Christmas. I'm also planning to make this up to eat with my family on Christmas morning. I wish you all a very blessed Christmas and a Happy New Year! Remember the reason for the season!!

Christmas Morning Coffee Cake Mix
Ingredients:
4 cups all-purpose flour
2 cups packed brown sugar
2/3 cup quick-cooking oats
1/3 cup buttermilk blend powder (my husband found this at Wal-Mart)
2 tsp. baking powder
2 tsp. ground cinnamon
1 tsp. salt
1/2 tsp. ground nutmeg
1 cup shortening
Topping Mix:
1/2 cup graham cracker crumbs
1/2 cup chopped pecans
1/4 cup packed brown sugar
1/2 tsp. ground cinnamon
Directions:
In a large bowl, combine the first eight ingredients. Cut in shortening until mix is crumbly. In a small bowl, combine topping ingredients. Store both mixes in separate airtight containers in a cool dry place for up to 6 months. Yield: 2 batches
To prepare:
In a large bowl combine 2 eggs, 1 cup water, and 4 1/2 cups cake mix (or half of the big batch if you've divided it up). Stir until just blended. Transfer to a greased 9-inch square baking pan. Sprinkle with 2/3 cup topping mix (or half the original batch). Bake at 350 degrees for 30-35 minutes, or until a toothpick comes out clean. Serve warm.

After making my batches, I went ahead and divided each batch into two, spooning the mixes into Ziploc baggies. I labeled the baggies as you can see below.

To package these gifts, I stitched up some little fabric bags (since I love to sew and had some Christmas fabric on hand) and placed a baggie of cake mix and topping mix into each fabric bag along with a card with preparation instructions. Then I tied the top closed with ribbon. You can see some of our finished bags in the photo below. I will be sure to tell the recipients to open before Christmas. I'm also planning to make this up to eat with my family on Christmas morning. I wish you all a very blessed Christmas and a Happy New Year! Remember the reason for the season!!

Monday, December 13, 2010
Mommy & Me Monday: Handprint Santa cards

I'm pulling this project out of my archives from two years ago. CLICK HERE to read the original post with all the details and photos.
Two years ago my sons and I made these to give out to the guests who came to our house for Christmas dinner. These would also be so cute in a frame to pull out each year as a keepsake. Or they could be done on a canvas and given as a gift or saved as a keepsake.
Two years ago my sons and I made these to give out to the guests who came to our house for Christmas dinner. These would also be so cute in a frame to pull out each year as a keepsake. Or they could be done on a canvas and given as a gift or saved as a keepsake.
Monday, December 6, 2010
Mommy & Me Monday: CUTE Neighbor Gifts
OK...........I was SO excited to find this super-cute gift idea on the Beehive Cottage blog. In case you are wondering, I started subscribing to the Beehive Cottage blog because Maryjane, the blogger, has the most adorable restored vintage travel trailer. If you click through to her blog, check out the photos of her trailer on the sidebar. I totally want one in my backyard. It could be my own little MomCave. Anyway, I digress. I loved this idea so much that I headed to Family Dollar this week and bought all the Junior Mints they had as well as four 2-packs of stretchy magic gloves for $2 each. You can make this super-cute gifts for less than $2 each. I am going to have the boys help me make them up so they can give them to their school principals and specials teachers.

To make these, click on the link above. That will take you to the blog where you can print out the snowman face. I printed mine on regular printer paper. Depending upon what treat you want to wrap, you will need to trim the snowman printable down to fit. I chose Junior Mints because #1: I love them (having a hard time not ripping into one of the boxes, actually) and #2: They seem very minty-fresh, and, therefore, true to the Christmas season. These would also be awesome wrapped around huge chocolate bars (I actually considered this, but the mints at Family Dollar were about 25 cents cheaper) or (like Maryjane did) wrapped around packages of microwave popcorn. I just taped my wrapper on the back using Scotch tape. I will add a sticker tag with our family name.
NOTE: You could also just trim printer paper and have your child draw a snowman face and buttons. That would make this gift even more personalized.
After putting the wrapper on, pull a glove over the top like a stocking cap and tie the fingers together with a ribbon as shown. This would be a great gift with a pair of gloves. However, I am doing mine on the cheap and just using one glove per gift. That way I can make 16 gifts from only four 2-packs of gloves. (NOTE: Pamida has 2-packs of magic gloves one sale for $1.98 right now.)


To make these, click on the link above. That will take you to the blog where you can print out the snowman face. I printed mine on regular printer paper. Depending upon what treat you want to wrap, you will need to trim the snowman printable down to fit. I chose Junior Mints because #1: I love them (having a hard time not ripping into one of the boxes, actually) and #2: They seem very minty-fresh, and, therefore, true to the Christmas season. These would also be awesome wrapped around huge chocolate bars (I actually considered this, but the mints at Family Dollar were about 25 cents cheaper) or (like Maryjane did) wrapped around packages of microwave popcorn. I just taped my wrapper on the back using Scotch tape. I will add a sticker tag with our family name.
NOTE: You could also just trim printer paper and have your child draw a snowman face and buttons. That would make this gift even more personalized.
After putting the wrapper on, pull a glove over the top like a stocking cap and tie the fingers together with a ribbon as shown. This would be a great gift with a pair of gloves. However, I am doing mine on the cheap and just using one glove per gift. That way I can make 16 gifts from only four 2-packs of gloves. (NOTE: Pamida has 2-packs of magic gloves one sale for $1.98 right now.)

Monday, November 29, 2010
Mommy & Me Monday: Make Minty Marshmallows
Now don't be intimidated by this one. Trust me. Homemade marshmallows are much easier than you might think and they taste SO AWESOME! Your children (and you) will be amazed that you made your own marshmallows. This recipe makes a ton of marshmallows. These would be such a cute little gift packaged with some cocoa mix in a Christmas mug. CLICK HERE for a very detailed (with lots of photos) post about our experience making these two years ago. These are on the top of my Advent TO-DO list this year. As Amber mentioned in her great post with lots of Advent links, you can visit my blog and see all the Advent things we've done in the past. There is a link on the right sidebar in the "Categories" column that says "Advent Activities". Click on that link and it will give you a full list of all my advent posts.


Saturday, November 27, 2010
Festival of Trees
 Join us for a tour of the Mills County Museum's Festival of Trees on December 4th at 9:00. We will tour the 35+ trees on display at the museum and then enjoy some juice and rolls. You are welcome to bring your kids with you if wanted.
You won't want to miss the MOPS tree and the MOPPETS tree- made with ornaments created by our own little ones!
Please RSVP to Amber at amberloo22@aol.com by December 2nd
Monday, November 22, 2010
Mommy & Me Monday: Harvest Blessing Mix & Gratitude Journal Activity
I have two ideas for you this week. I have done both of these in the past, but not for a few years. The first idea is a little Gratitude journal that you make with your family on Thanksgiving Day when everyone is gathered around the table. All you need are some shipping tags (or you could use pieces of cardstock or even index cards), some sticker letters (or you could write the letters with markers), and some ribbon or string to tie the tags together once you are done.
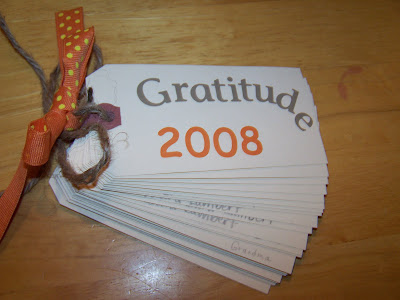
Below you can see ours from 2008. Ahead of time you need to put one letter on each tag, one for each letter of the alphabet. You can also make a "title" tag like I did which says "Gratitude" and the year. Do not attach the tags together yet. At your Thanksgiving gathering, pass out a tag to every person present. If you have fewer than 26 people, some people will get multiple tags. Each person has to write one (or more) thing they are thankful for that begins with the letter on their tag. Then you gather all the tags, place them in ABC order, and tie them together. You'll have a great little keepsake of your gathering that you can look back on in years to come. If you like this idea, don't make it too hard. I think I literally slapped the one shown together about 30 minutes before we went to my mom's house on Thanksgiving Day. Just use what you have on hand to make it work.
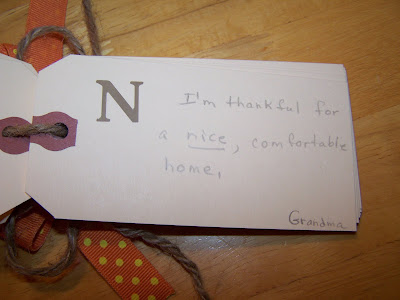
Here is a page from the inside to show what a completed tag looks like. Wilma wrote this one!!
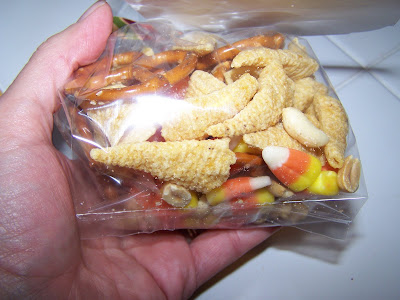
The next idea is called Harvest Blessing Mix. I like to make up bags of these to give out as little gifts in November. (Although I have not made them for at least 5 years until this year.) The boys helped me (kind of..........mostly they just ate the pieces that spilled out of the bowl) make these. They will each take a bag to their teachers this week. I'll also give some to my co-workers and we'll pass out some to our relatives when we get together with them on Thanksgiving. Each item in this mix represents an aspect of Thanksgiving. If you would like a copy of the tag I used, please email me and I'll send it to you. Blogger doesn't allow me to upload a document for download, unfortunately.
To make this mix you'll need: Bugles (I have never seen these at No Frills locally, but I did find them at Newman's; Dollar General also has them); orange slices (you could substitute dried fruit, but I LOVE orange slice candy, so that's what I used); pretzel twists; peanuts (or you could substitute sunflower seeds) and candy corn.

Mix it all together in a big bowl and then divide it into individual bags for giving. I like to attach a tag that tells the significance of each item. Here is a list of that if you are interested:
The Bugles represent a cornucopia or horn of plenty; the Pretzels represent arms folded in thanks and prayer; the Candy Corn represents the five kernels per day the Pilgrims were given during the first winter; the Orange Slices represent a successful harvest; and the Peanuts are seeds which represent the potential for a bountiful harvest next season.

Wouldn't you just love to give out bags of these this year? Be sure to save some to munch on yourself! I have the extra orange slices stashed away in a place only I can find!
Below you can see ours from 2008. Ahead of time you need to put one letter on each tag, one for each letter of the alphabet. You can also make a "title" tag like I did which says "Gratitude" and the year. Do not attach the tags together yet. At your Thanksgiving gathering, pass out a tag to every person present. If you have fewer than 26 people, some people will get multiple tags. Each person has to write one (or more) thing they are thankful for that begins with the letter on their tag. Then you gather all the tags, place them in ABC order, and tie them together. You'll have a great little keepsake of your gathering that you can look back on in years to come. If you like this idea, don't make it too hard. I think I literally slapped the one shown together about 30 minutes before we went to my mom's house on Thanksgiving Day. Just use what you have on hand to make it work.
Here is a page from the inside to show what a completed tag looks like. Wilma wrote this one!!
The next idea is called Harvest Blessing Mix. I like to make up bags of these to give out as little gifts in November. (Although I have not made them for at least 5 years until this year.) The boys helped me (kind of..........mostly they just ate the pieces that spilled out of the bowl) make these. They will each take a bag to their teachers this week. I'll also give some to my co-workers and we'll pass out some to our relatives when we get together with them on Thanksgiving. Each item in this mix represents an aspect of Thanksgiving. If you would like a copy of the tag I used, please email me and I'll send it to you. Blogger doesn't allow me to upload a document for download, unfortunately.
To make this mix you'll need: Bugles (I have never seen these at No Frills locally, but I did find them at Newman's; Dollar General also has them); orange slices (you could substitute dried fruit, but I LOVE orange slice candy, so that's what I used); pretzel twists; peanuts (or you could substitute sunflower seeds) and candy corn.

Mix it all together in a big bowl and then divide it into individual bags for giving. I like to attach a tag that tells the significance of each item. Here is a list of that if you are interested:
The Bugles represent a cornucopia or horn of plenty; the Pretzels represent arms folded in thanks and prayer; the Candy Corn represents the five kernels per day the Pilgrims were given during the first winter; the Orange Slices represent a successful harvest; and the Peanuts are seeds which represent the potential for a bountiful harvest next season.

Wouldn't you just love to give out bags of these this year? Be sure to save some to munch on yourself! I have the extra orange slices stashed away in a place only I can find!

Monday, November 15, 2010
Mommy & Me Monday: Turkey Handprint Trivets
These would make great grandparent gifts. It would also be fun to make a bunch and use them each year on your Thanksgiving table.
Below you can see most of the supplies used. I traced the boys' hands on the wrong side of some scrapbook paper and cut them out. Instead of doing each "feather" in a different paper, I decided to use a brown plaid paper I really liked for the whole tail. I used my star punch to make feet and a beak (I cut off a star point for the beak) and my heart punch (cut in half) for the wattle. I used a regular size hole punch to punch out an eye. The photo shows everything laid out on the tile before I Mod-Podged it. That's why it looks kind of crooked. The first step was to spread a thin layer of Mod Podge all over the clean, dry tile with a foam brush. Then I laid out the paper pieces and brushed another layer of Mod Podge over the top. After that coat was dry I added stickers to spell each boy's name and the year. Then I put another 2 coats of Mod Podge over the top again to really adhere the stickers. The photo below shows one tile which is mostly dry and the other one still wet. If you try this and have never used Mod Podge, don't worry, it dries clear.
  I think these turned out SOOOOO cute. I am so happy with them. I will add little felt circles (like the kind you put under furniture) to the back corners. I think I'll also pick up some little plate easels at Hobby Lobby and display these on a shelf in an upright position. They will be fun to pull out each year. I was barely able to fit my 9 year olds' hand on one, so I'm glad I did it this year. He might be too big next year to do this!
Below you can see most of the supplies used. I traced the boys' hands on the wrong side of some scrapbook paper and cut them out. Instead of doing each "feather" in a different paper, I decided to use a brown plaid paper I really liked for the whole tail. I used my star punch to make feet and a beak (I cut off a star point for the beak) and my heart punch (cut in half) for the wattle. I used a regular size hole punch to punch out an eye. The photo shows everything laid out on the tile before I Mod-Podged it. That's why it looks kind of crooked.
The first step was to spread a thin layer of Mod Podge all over the clean, dry tile with a foam brush. Then I laid out the paper pieces and brushed another layer of Mod Podge over the top. After that coat was dry I added stickers to spell each boy's name and the year. Then I put another 2 coats of Mod Podge over the top again to really adhere the stickers. The photo below shows one tile which is mostly dry and the other one still wet. If you try this and have never used Mod Podge, don't worry, it dries clear. I think these turned out SOOOOO cute. I am so happy with them. I will add little felt circles (like the kind you put under furniture) to the back corners. I think I'll also pick up some little plate easels at Hobby Lobby and display these on a shelf in an upright position. They will be fun to pull out each year. I was barely able to fit my 9 year olds' hand on one, so I'm glad I did it this year. He might be too big next year to do this!
Monday, November 8, 2010
Mommy & Me Monday: Turkey Candleholders
*Edited to add finished photo- click here for step by step directions from Laura's blog.

Hello! I am super-irritated that once again Blogger did not allow me to post photos in the MOPS blog. However, I WAS able to post them in my personal Blogger blog (go figure!) and so I hope you'll CLICK HERE to link to the post I wrote about a VERY cute project to do with your little one for Thanksgiving. These are super cute, super easy, and would make a SUPER gift for anyone around your Thanksgiving table.
Monday, November 1, 2010
Mommy & Me Monday: Pumpkin Pie in a Jar
Hello and Happy November! Hopefully you are not warding off sugar-crazed children while trying to read this post!! Now that Halloween has passed, I am really excited to share several ideas with you in November. I am so glad I have made it through October and am looking forward to doing several fun projects with my boys this month.
I LOVE to make fun little gifts to give others and the blogosphere is an endless source of inspiration for me. I found the idea for this project on Saturday, made it on Sunday afternoon, and we were able to pass out these little pies in a jar to several of the houses where we trick-or-treat each year. The recipe for these can be found at THIS LINK on the Crafting Chicks blog. Their blog is new to me and I immediately signed up as a subscriber. So many fun ideas! I will admit that I mostly made this recipe by myself. My youngest son was at a birthday party and my oldest was doing some work that he needed to get done. Still, they both enjoyed passing these out on Halloween night. We usually take them trick-or-treating to the homes of their classroom teachers, so they were able to spread the Halloween love to their teachers. This would be a great gift to give anytime during the fall. And it tastes REALLY good!!

The photo above shows one of the jars with the graham cracker "crust" inside. I placed the jars into the fridge for about an hour to let the crust chill before adding the filling and topping. Using the box the jars came in made it really easy to stick them into the fridge.

The photo below shows the jars filled with the three layers: crust, filling and whipped topping. I used a paper towel to wipe off the filling that got on the inside of the jars when I filled them.

To "cuten" up the project, I used my scrapbooking tools and some pretty paper to cut circles that I placed on the lids. I didn't even glue them on, I just put them on top of the lid and screwed the ring on. Then I printed some labels on the computer and attached those to the side of the jar. The final step was using some twine to tie a spoon to the side. I am so happy with how these turned out. This may become a new Halloween tradition for our family. I really want to instill the joy of giving in my boys. While I love gifts and surprises, I get MUCH more enjoyment from giving something unexpected to others than from receiving a gift myself.

Yumminess in a jar!! How cute is that?

I LOVE to make fun little gifts to give others and the blogosphere is an endless source of inspiration for me. I found the idea for this project on Saturday, made it on Sunday afternoon, and we were able to pass out these little pies in a jar to several of the houses where we trick-or-treat each year. The recipe for these can be found at THIS LINK on the Crafting Chicks blog. Their blog is new to me and I immediately signed up as a subscriber. So many fun ideas! I will admit that I mostly made this recipe by myself. My youngest son was at a birthday party and my oldest was doing some work that he needed to get done. Still, they both enjoyed passing these out on Halloween night. We usually take them trick-or-treating to the homes of their classroom teachers, so they were able to spread the Halloween love to their teachers. This would be a great gift to give anytime during the fall. And it tastes REALLY good!!
NOTE: If you make these, try to find the half-pint wide-mouth jars. I had to use the regular mouth ones which are taller and narrower. It worked okay, but it got a little messy when I was putting the filling in and I think that would have been easier with a wider mouthed jar.

The photo above shows one of the jars with the graham cracker "crust" inside. I placed the jars into the fridge for about an hour to let the crust chill before adding the filling and topping. Using the box the jars came in made it really easy to stick them into the fridge.

The photo below shows the jars filled with the three layers: crust, filling and whipped topping. I used a paper towel to wipe off the filling that got on the inside of the jars when I filled them.

To "cuten" up the project, I used my scrapbooking tools and some pretty paper to cut circles that I placed on the lids. I didn't even glue them on, I just put them on top of the lid and screwed the ring on. Then I printed some labels on the computer and attached those to the side of the jar. The final step was using some twine to tie a spoon to the side. I am so happy with how these turned out. This may become a new Halloween tradition for our family. I really want to instill the joy of giving in my boys. While I love gifts and surprises, I get MUCH more enjoyment from giving something unexpected to others than from receiving a gift myself.

Yumminess in a jar!! How cute is that?

Monday, October 25, 2010
Mommy & Me Monday: Candy Corn Family Playset
Are you looking for a totally cute, calorie-free Halloween surprise for your little ones? Hop over to the Frugal Family Fun blog and check out this little Candy Corn family playset. It is so cute, so cheap to make, and guaranteed to get a few laughs (and maybe some major play time!). If I get a chance I may make a set of these for my boys to surprise them.

If you are feeling super-ambitious (and you have basic sewing skills), consider making this little candy corn drawstring bag to hold your little candy corn family. I made these bags a few years ago, filled them with candy corn, and gave them to my boys for Halloween. CLICK HERE for a link to the tutorial I used to sew these.
Monday, October 18, 2010
Mommy & Me Monday: Halloween Wreaths
Hello! Here is another "cheater" post linking you to a post I wrote two years ago about some cute Halloween wreaths I made with my boys. CLICK HERE to check it out. It involves painting your child's feet and making "ghosts" with their footprints. Try it! They turn out so cute and you can pull them out every year and have your children "match" their feet to see how much they've grown!
Subscribe to:
Posts (Atom)